Showing posts with label mobile. Show all posts
Showing posts with label mobile. Show all posts
Monday, November 17, 2014
Sim IC Jumpers For All China Model Mobile Phones

Sim IC Jumpers For All China Model Mobile Phones
Sim IC Jumpers For All China Model Mobiles Repair
Sim IC Jumpers For All Models Of Chima Mobiles
Sunday, November 9, 2014
Nokia Mobile Secret Code
Nokia Secret Codes that will works on most of Nokia phones either Java based or Symbian operating system based. These codes are very useful on your NOKIA MOBILE.
(1) *#06# for checking the IMEI (International mobile equipment identity)
(2) *#7780# this code use reset to your mobile factory settings.
(3) *#67705646# This will clear the LCD display on your mobile (operator logo).
(4) *#0000# To view software version.
(5) *#2820# Bluetooth device address use your nokia mobile.
(6) *#746025625# Sim clock allowed status.
(7) #pw+1234567890+1# Shows if sim have restrictions.
~Use *#30# code combination to see a private number in case someone is calling you and uses this feature.
~To find out the clock status of the SIM card inside the phone use the code combination
(8) *#746085685#. This code is only available on some Nokia phones.
~Symbian phones allows users to use the soft reset command without browsing for it in the main menu.
(9) *#7370#Simply use the code to soft format the memory of the phone.
(10) *#92702689# - takes you to a secret menu where you may find some of the information below:
1. Displays Serial Number for your nokia mobile .
2. Displays the Month and Year of Manufacture for your nokia mobile
3. Displays (if there) the date where the phone was purchased (MMYY)
4. Displays the date of the last repair - if found (0000)
5. Shows life timer of phone (time passes since last start)
(11) *#3370# - Enhanced Full Rate Codec (EFR) activation. Increase signal and strength, better signal reception. It also help if you want to use GPRS and the service is not responding or too slow. Phone battery will drain faster though.
*#3370* - (EFR) deactivation. Phone will automatically restart. Increase battery life by 30% because phone receives less signal from network.*#4720# - Half Rate Codec activation.
(12) *#4720* - Half Rate Codec deactivation. The phone will automatically restart
If you forgot wallet code for s60 phone, use this code reset: *#7370925538#
Note, your data in the wallet will be erased. Phone will ask you the lock code. Default Lock code is: 12345
(13) Press *#3925538# show to delete the contents and code of wallet.
(14) *#7328748263373738# resets security code
Note: We are no Responsible for any damage plz use this code your own risk
ReadMore..
(1) *#06# for checking the IMEI (International mobile equipment identity)
(2) *#7780# this code use reset to your mobile factory settings.
(3) *#67705646# This will clear the LCD display on your mobile (operator logo).
(4) *#0000# To view software version.
(5) *#2820# Bluetooth device address use your nokia mobile.
(6) *#746025625# Sim clock allowed status.
(7) #pw+1234567890+1# Shows if sim have restrictions.
~Use *#30# code combination to see a private number in case someone is calling you and uses this feature.
~To find out the clock status of the SIM card inside the phone use the code combination
(8) *#746085685#. This code is only available on some Nokia phones.
~Symbian phones allows users to use the soft reset command without browsing for it in the main menu.
(9) *#7370#Simply use the code to soft format the memory of the phone.
(10) *#92702689# - takes you to a secret menu where you may find some of the information below:
1. Displays Serial Number for your nokia mobile .
2. Displays the Month and Year of Manufacture for your nokia mobile
3. Displays (if there) the date where the phone was purchased (MMYY)
4. Displays the date of the last repair - if found (0000)
5. Shows life timer of phone (time passes since last start)
(11) *#3370# - Enhanced Full Rate Codec (EFR) activation. Increase signal and strength, better signal reception. It also help if you want to use GPRS and the service is not responding or too slow. Phone battery will drain faster though.
*#3370* - (EFR) deactivation. Phone will automatically restart. Increase battery life by 30% because phone receives less signal from network.*#4720# - Half Rate Codec activation.
(12) *#4720* - Half Rate Codec deactivation. The phone will automatically restart
If you forgot wallet code for s60 phone, use this code reset: *#7370925538#
Note, your data in the wallet will be erased. Phone will ask you the lock code. Default Lock code is: 12345
(13) Press *#3925538# show to delete the contents and code of wallet.
(14) *#7328748263373738# resets security code
Note: We are no Responsible for any damage plz use this code your own risk
Saturday, November 8, 2014

Wednesday, October 1, 2014
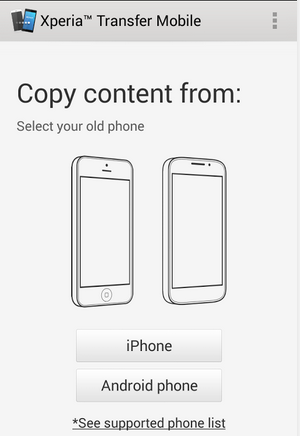
How to transfer Contacts SMS Photos Files from Android Phone to Sony Xperia Mobile
Mobiles phones have become the lifeline in everyone’s life these days and some valuable data is being stored in everyone’s device ranging from Credit and Debit Cards details, Photos and Videos, Documents, Calendar, Bookmarks and Notes. The importance of Cloud Back-up is also increasing because people do not want to loose any data from their devices. And in case you have got a new Sony Xperia device you can transfer all the above mentioned data into it from your earlier Android or iOS Apple device.
And here we are going to show you a simple way to transfer your all important data from your Android or iOS device to Sony Xperia Smartphones:
You have to install a free APP called Xperia Transfer Mobile on both your devices the new Xperia Smartphone and also the OLD phone from which you want to transfer the data (Play Store Link)
With this app you can transfer Contacts, Calendar, SMS, MMS, Bookmarks, Notes, Photos, Music, Videos and Apps (only from iPhone)
After installing the app on both devices you have to Pair the devices together either by entering the PIN and in case you have NFC you can tap both the devices together to initiate the transfer process.
Select the Old Device – iPhone or Android phone

In case of Apple iPhone you have to connect your devices with the wire provided by Sony in the Xperia box or you can even choose to transfer it through WiFi like in android devices.
In case of Android devices WiFi Direct needs to be activated to start the transfer
Note: Data which is present on your device will be transferred and the data synced with online services will not be transferred with this App.
Devices Supported:
Old Phone: Android 4.0 and later, iOS 4.0 and later
New Phone: Android Jelly Bean 4.3 and later
Make sure that you recheck that all your important data is transferred properly to your new Xperia Smartphone before deleting the data from your old phone as sometimes some data will not be transferred due to certain restrictions and errors.
In case you want to transfer any data between any phone and your Xperia device you can use this app to transfer stuff like Videos, Music etc faster than through Bluetooth, but the only problem is that you cannot select any photos or videos separately and all the photos and videos will be sent.
And here we are going to show you a simple way to transfer your all important data from your Android or iOS device to Sony Xperia Smartphones:
You have to install a free APP called Xperia Transfer Mobile on both your devices the new Xperia Smartphone and also the OLD phone from which you want to transfer the data (Play Store Link)
With this app you can transfer Contacts, Calendar, SMS, MMS, Bookmarks, Notes, Photos, Music, Videos and Apps (only from iPhone)
After installing the app on both devices you have to Pair the devices together either by entering the PIN and in case you have NFC you can tap both the devices together to initiate the transfer process.
Select the Old Device – iPhone or Android phone
Select the Data which you want to transfer to your new Xperia device like the Bookmarks, Photo, Music, Video and then Start Transfer.
In case of Apple iPhone you have to connect your devices with the wire provided by Sony in the Xperia box or you can even choose to transfer it through WiFi like in android devices.
In case of Android devices WiFi Direct needs to be activated to start the transfer
Note: Data which is present on your device will be transferred and the data synced with online services will not be transferred with this App.
Devices Supported:
Old Phone: Android 4.0 and later, iOS 4.0 and later
New Phone: Android Jelly Bean 4.3 and later
Make sure that you recheck that all your important data is transferred properly to your new Xperia Smartphone before deleting the data from your old phone as sometimes some data will not be transferred due to certain restrictions and errors.
In case you want to transfer any data between any phone and your Xperia device you can use this app to transfer stuff like Videos, Music etc faster than through Bluetooth, but the only problem is that you cannot select any photos or videos separately and all the photos and videos will be sent.
Quick Heal Mobile Security
QUICK HEAL: BEST ANDROID SECURITY

Due To Continuos Cracks and Hacks launch in The market to Crash a smartphones To Reduce the functioning Capacity Of a Smartphone there are a Number Of Viruses found and so to Stop these viruses Quick Heal Corporation has LaunchedQUICK HEAL MOBILE SECURITY
FEATURES:
Virus Protection
- Assured protection from all kinds of malware threats. Automatic real-time virus and spyware scans with optional manual scan. Gives you the flexibility to use your mobile device without interruptions while scans run in the background.
Call Blocking
- This feature enables you to block unwanted calls by creating a Black List of numbers.
SMS Blocking
- With this feature you can silently block unwanted SMSs. It also scans and filters embedded links in messages.
SMS Spam Protection
- Filter unwanted SMSs and block spam SMSs from unknown senders and easily configure Black list and White list.
Anti-Theft
- Helps you track, lock or remotely render the mobile device useless in case of a loss or theft. You can also wipe selected data remotely by sending a predefined SMS.
Detailed reports
- Get extensive reports for all the above features.
Monday, September 22, 2014
MOBILE N18 Charging Solution

if you check it much give few comments about this so that others can learn form your comments also.
If you have any other Questions please do not hesitate to share with me.
Friday, September 19, 2014
Top 10 Android Apps and Most popular mobile platform
Top 10 Android Apps and Most popular mobile platform : Android powers hundreds of millions of mobile devices in more than 190 countries around the world. Its the largest installed base of any mobile platform and increasing fast—every day another million users power up their Android devices for the first time and begin looking for apps, games, and other digital content.
Android gives you a world-class platform for creating apps and games for Android users all over the place, as well as an open marketplace for distributing to them instantly.
2. Mobile Observatory – Astronomy
3. SkEye | Astronomy
4. Distant Suns (max)
5. Star Chart
6. Stellarium Mobile Sky Map
7. Astronomy Picture of the Day
8. Vortex Planetarium – Astronomy
9. Planetarium
10. Night Sky Tools – Astronomy
Necessity of Most popular platform :
1. Large installed base and Global partnerships
2. Powerful development framework
3. Open marketplace for distributing apps
Thursday, September 18, 2014
Dont Receive Your Mobile While Charging Bad effect of high frequency radiation
Dont Receive Your Mobile While Charging : Receiving mobile during charging is not secured. Now a days mobile is the most essential and significant things in the world. But it may be so much harmful for did not obey the rules of proper using. In the meantime some people have died for did not managing the rules. Mobile phone contains high frequency radiation. It provides high frequency to our body. Its so much harmful for our brain. Also harmful for high frequency radiation for long time talking. Having some bad effect of high frequency radiation. The radiation can makes cancer also with high frequency. During charging the radiation increases and so much dangerous situation may occurs if receive a call during this time. So please avoid receiving call while your mobile is in charging position. Mobile phone may busts and human body may destroy or burn if the mobile received during charging. Also it can create skin disease or skin cancer of a human body. This is the main bad effect of high frequency radiation. It proved with some practical experiment and world class cancer specialist in the world. So we must need to avoid the situation and also need to avoid long time talking to protect high frequency radiation bad effect.
Tuesday, September 16, 2014
Sunday, September 14, 2014
Reset Your Samsung Mobile
Reset Your Samsung Mobile : Samsung mobile is now most popular brand in the world.Different types of model, different types of feature and for different types of apps Samsung mobile is famous. Android apps are so much popular that at first introduced from Samsung. You may face some problem in your Samsung mobile, Samsung Galaxy, Samsung Galaxy TAB and Samsung Smart Phone. Also you can face problem by selecting unnecessary theme, apps and any other software. Just follow a simple step to recover such kind of problem....
- Go to your mobile setting
- go to phone setting
- select restore factory setting or reset phone setting
- type eight (8) digit password as 00000000
- Click on reset or ok
- That all... your problem solved.
Thanks.
Saturday, September 13, 2014
Sunday, September 7, 2014
All Mobile Charging Problem Solutions
All Mobile Charging Problem Solutions : There are many kinds of mobile user at home and abroad. All people are not so much experienced about that. Due to full charge, overloading charge of battery, battery may be damage. So always try to be charge your mobile battery with a perfect time. First time must give 8 hours charge, after that dont give charge more than 2 hour. Every month 2 times must empty your mobile battery to protect battery from unexpected situation and to increase longevity of mobile. Its very difficult to protect mobile from every interrupt. High voltage of electricity, overloading of charging battery, high temparature may be harmful for your smart phone, iphone or any kinds of mobile.
So please try to avoid such situation, dont try to charge your mobile in all steps. Your battery consists of 3 ot 4 steps. So after 1 step you may charge your mobile, after 2 step you may charge your mobile, after 3 step you may charge your mobile. But its strongly recommonded for you, for your mobile and also for mobile battery after 4 step you have to charge your mobile. In different step you have to ignore to charge your mobile. You can safe your mobile and your mobile will be more effective long times. So keep your mobile safe, protect your mobile from high temperature, overloading charge and always secured from others effect.
ReadMore..
So please try to avoid such situation, dont try to charge your mobile in all steps. Your battery consists of 3 ot 4 steps. So after 1 step you may charge your mobile, after 2 step you may charge your mobile, after 3 step you may charge your mobile. But its strongly recommonded for you, for your mobile and also for mobile battery after 4 step you have to charge your mobile. In different step you have to ignore to charge your mobile. You can safe your mobile and your mobile will be more effective long times. So keep your mobile safe, protect your mobile from high temperature, overloading charge and always secured from others effect.
Thursday, August 28, 2014
T Mobile LG G2 D801 Using Android 4 4 2 KitKat PAC man ROM How To Install Guide
T-Mobile LG G2 D801 can be updated to latest Android 4.4.2 KitKat. The upgrade is possible with the help of custom ROM PAC-man. The development team of PAC-man ROM finally introduced Android 4.4.2 KitKat based PAC-man ROM for T-Mobile LG G2 D801. Which means, you can download and install custom firmware PAC-man to update your T-Mobile LG G2 D801 to latest Android 4.4.2 KitKat. T-Mobile LG G2 D801 comes with good hardware spec, hence is capable to run PAC-man smoothly. PAC-man ROM consist various features of Paranoid Android, AOKP and CyanogenMod. The link Im sharing is PAC-man nightly build. The good thing about nightly build is, you will receive update daily and bugs are fixed faster as well as new feature introduced regularly. Continue reading this guide to know how to install Android 4.4.2 KitKat based PAC-man custom ROM on T-Mobile LG G2 D801.
PAC-man comes with various useful customization. Since, PAC-man is based on Android 4.4.2 KitKat, you may like to know whats new on it. Some of the cool Android 4.4.2 KitKat features that you will enjoy is Screen Recording, Tap to Pay (Google Wallet for everyone), NFC emulation for non nfc devices, 14% less memory usage, cloud printing from Gallery, Google Home is the new Launcher, Core System Processes Trimmed, apps are efficient and responsive on all devices, the all new procstats tool details memory use, Full-screen Immersive mode, seamless change in resolution during media playback, Phone dialer got local business detection, redesigned Quickoffice and many more.
Please note, not all Android 4.4.2 KitKat feature yet ported to PAC-man ROM.

Another thing you should note, this is nightly build, hence expect some bugs in it. All bugs and issues expected to be fixed as development progress towards a stable PAC-man build.
Warning!
This tutorial is only for T-Mobile LG G2 D801. Don’t try this guide on any other Android device. Also, we (Android Pulp Team) are not responsible for any damage caused due to the instruction given in this page. Try this at your own risk. However, it is very unlikely that your device will be damaged if you follow all the instructions as it is which are mentioned in procedure.
Pre Requisites:
1. ROM flashing require you to wipe your internal memory data, hence you required to backup your device data. You can follow our ultimate backup guide.
2. Make sure your device have at least 60% battery power. If your phone shut down during installation then there is good chance to brick your device.You can install an app like Battery Notifier BT Free on your Android device to check it easily.
3. You must have USB Driver Installed for T-Mobile LG G2 D801 in your PC. [Download USB Drivers]
4. Make sure USB Debugging is enabled otherwise its wont be possible to transfer file between PC and T-Mobile LG G2 D801. [Guide].
5. Your device have latest CWM version 6.0.4.4 and up or TWRP 2.6.3.1 and up installed. [General Guide]
If you done everything that we mentioned above then you are ready to follow step-by-step guide on how to install Android 4.4.2 KitKat based PAC-man ROM on T-Mobile LG G2 D801.
File Required(Download by clicking on it)
ReadMore..
PAC-man comes with various useful customization. Since, PAC-man is based on Android 4.4.2 KitKat, you may like to know whats new on it. Some of the cool Android 4.4.2 KitKat features that you will enjoy is Screen Recording, Tap to Pay (Google Wallet for everyone), NFC emulation for non nfc devices, 14% less memory usage, cloud printing from Gallery, Google Home is the new Launcher, Core System Processes Trimmed, apps are efficient and responsive on all devices, the all new procstats tool details memory use, Full-screen Immersive mode, seamless change in resolution during media playback, Phone dialer got local business detection, redesigned Quickoffice and many more.
Please note, not all Android 4.4.2 KitKat feature yet ported to PAC-man ROM.
Another thing you should note, this is nightly build, hence expect some bugs in it. All bugs and issues expected to be fixed as development progress towards a stable PAC-man build.
Warning!
This tutorial is only for T-Mobile LG G2 D801. Don’t try this guide on any other Android device. Also, we (Android Pulp Team) are not responsible for any damage caused due to the instruction given in this page. Try this at your own risk. However, it is very unlikely that your device will be damaged if you follow all the instructions as it is which are mentioned in procedure.
Pre Requisites:
1. ROM flashing require you to wipe your internal memory data, hence you required to backup your device data. You can follow our ultimate backup guide.
2. Make sure your device have at least 60% battery power. If your phone shut down during installation then there is good chance to brick your device.You can install an app like Battery Notifier BT Free on your Android device to check it easily.
3. You must have USB Driver Installed for T-Mobile LG G2 D801 in your PC. [Download USB Drivers]
4. Make sure USB Debugging is enabled otherwise its wont be possible to transfer file between PC and T-Mobile LG G2 D801. [Guide].
5. Your device have latest CWM version 6.0.4.4 and up or TWRP 2.6.3.1 and up installed. [General Guide]
If you done everything that we mentioned above then you are ready to follow step-by-step guide on how to install Android 4.4.2 KitKat based PAC-man ROM on T-Mobile LG G2 D801.
File Required(Download by clicking on it)
- PAC-man For T-Mobile LG G2 D801 [Filename: pac_d801-nightly-20140514.zip]
- Google Apps [Filename: pa_gapps-stock-4.4.2-20140207-signed.zip]
- Connect your device to PC using USB cable and then copy downloaded files to the SD card of your device. Important: Don’t extract any files.
- Disconnect USB and then turn off your T-Mobile LG G2 D801.
- Now, boot into recovery mode. To do so, press and hold Volume down & Power, when the LG logo appears release and press them again, then press the Power button three times! In recovery use Volume Keys to navigate between option and Power button to select an option. Alternatively try this: Recovery Mode without Key Combination.
- Perform a Nandroid backup of your existing ROM that you can restore later if this new ROM not work or you want to go back into your previous ROM. To perform a backup, select Backup and Restore, then on the next screen, select Backup again. Go back to main recovery menu after backup is complete.
- Now, perform data wiping task. To do so, select wipe data/factory reset, then select Yes on next screen to confirm your action. Wait few minutes till the data wipe is complete. Now come back to CWM recovery main menu. Select wipe cache partition and after wiping process done, select Wipe Dalvik Cache under advance option to perform Dalvik cache wiping.
- Select install zip from sdcard, then select choose zip from sdcard. Now, locate the PAC-man Zip file that you copied earlier in Step 1 and select it by pressing Power button. Confirm installation by selecting Yes – Install _____.zip on the next screen. The ROM installation will begin.
- Once the ROM installation process end, repeat the step 6 but choose the pa_gapps-stock-4.4.2-20140207-signed.zip file instead of ROM zip to install the Google apps package.
- When installation is completed, go back to the main recovery menu and select reboot system now to reboot your T-Mobile LG G2 D801 and boot up into Android 4.4.2 KitKat ROM PAC-man.
- Returning to Previous ROM: To go back to your previous ROM, boot into recovery, select backup and restore then restore your previous ROM by selecting it from the list.
- Connect your device to PC using USB cable and then copy downloaded files to the SD card of your device. Important: Don’t extract any files.
- Disconnect USB and then turn off your T-Mobile LG G2 D801.
- Now, boot into recovery mode. To do so, press and hold Volume down & Power, when the LG logo appears release and press them again, then press the Power button three times! Alternatively try this: Recovery Mode without Key Combination.
- Create a Backup using TWRP Backup Option.
- Perform a Factory Reset (this will delete all apps and their settings and game progress). To do this, Tap on Wipe, then at the bottom of the screen do a Swipe on the ‘Swipe to factory reset‘ option.
- Now its time to add zip file for flashing. Tap on Install, then browse to the location where you saved the files and tap on the PAC-man Zip file. Then tap on Add More Zips, and add pa_gapps-stock-4.4.2-20140207-signed.zip. Now at the bottom of the screen, do a swipe on the Swipe to confirm flash option to begin flashing.
- When installation is completed, go back to the main recovery menu and tap on Reboot and then, tap on System to reboot your T-Mobile LG G2 D801 and boot up into Android 4.4.2 KitKat ROM PAC-man.
- Returning to Previous ROM: To go back to your previous ROM, boot into recovery, select Backup then through Restore option, restore your previous ROM by selecting it from the list.
Saturday, August 23, 2014
How To Easy Root Cherry Mobile Flare S100 Without PC
Good evening and welcome friends of all activities in the different parts of the world wherever you are warm greetings from my admin So, if you are one of sau users of Cherry Mobile Flare S100 smartphone users and want to eradicate your phone, check out this tutorial. It is a very easy tutorial and to apply this tutorial on your phone, you do not need a PC, a USB cable, drivers etc. Only by using a file given below which can eradicate your phone with ease.

Before proceeding, I want to say to follow the full tutorial at your own risk, I will not be responsible for any damage to your phone. but it is impossible if you are careful in his practice
Pre-requirements:
- Please take a complete backup of your internal datas, because there is a chance of wiping the datas. If you have a backup you can restore them easily in case, if anything goes wrong.
- Make sure the battery percentage level of your phone was at-least 75%, otherwise it will get switched off during the middle of the rooting process.
Rooting Procedure:
- First download the rooting file from here to your computer.
- After that copy the downloaded file on your external SD card.
- Next update the zip file via stock recovery or install Superuser.apk.
- That’s it! Now, your Cherry Mobile Flare S100 smartphone was rooted. Enjoy.
Subscribe to:
Posts (Atom)