Sunday, August 31, 2014
Nokia 110 charging not supported solution
Today a man come to me for repairing his nokia 110 phone.His phones was water damage.I receive his phone then I open his phone and full wash next hot with Stan light more than 10 minute.Next I check phone phone is ok but when Check charging then showing massage on his phones screen " not supported solution"
Then I try to fiend out problem after ten minute I fiend problem.Then I successfully repair it now I share that solution.

Then I try to fiend out problem after ten minute I fiend problem.Then I successfully repair it now I share that solution.
How to do this: Check middle pin of battery connector that mins bsi line how many resistance If you see resistance is abnormal between normal phone then just this two parts this is a one capacitor and one resistor.
Smart Moto Code Reader
 Motorola
(T190, T191, T205) master code
- 19980722
- 20010903
**********
P2K test menu:
*#06#, menu, menu, 048263*
Test comands:
32*116*1*0*0 - read phone code
32*118*1*0*0 - read security code
18*0 - factory reset, phone code off
18*1 - master reset
54*18*1 - full phone reset
10*0*6 - select 900/1800
32*279*1*0*8 - model
32*383*1*0*0 - flex version
Hard reset MPX200, MPX220 - blue button + power on
Download get

How To Root and Unroot Using Framaroot Android Phones Without PC Using
Rooting is a very important thing that has to be done in any smartphone. Having reading weather to root or not to root your Tecno Android device, used Root Checker to confirm that it is not yet rooted and now ready to root it? So, you can get it done with one click without the fear of bricking your phone.
That one click which i earlier said concerning rooting solution has to do with the use of a Framaroot apk file.
This Framaroot; put together by senior XDA forum member, Alephziancan can immediately give you root access to your phone by pushing the superuser and su binaries to your device.
Rooting your Tecno phones using Framaroot is reversible like chemical change and it is very straight forward unlike some many other complex methods out there. There is No need for PC and even if the app fails to root your phone, you will be notified and nothing will happen to your phone.
Just know that the application is already compatible with with a list of devices from various manufacturers and is capable to root an Android device running version 2.x to 4.x.
Anybody that wants to get his Tecno Phone rooted must note that "Rooting voids your warranty, perform all actions at your will and with extreme caution."
And note that blogspot.com or the developer shall not be held responsible for your damage to your device.
Steps To Root Tecno Android Phones With Framaroot app

Step 1. With your Android Tecno phone, go to Settings > Security and Check “Unknown Sources”
Step 2. Now just download latest version of framarootto your phone.
Step 3. Now go to your device’s app manager and tap on “Framaroot” to execute it.
Step 4. Then follow the onscreen instructions and the process will start.
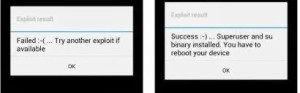
Step 5. After the above step just, reboot the device. Which you will later get a successful message.
Do you know that;
Making use of root checker to see if your phone is rooted is advisable, just click on Root Checker, then click Verify root Access to check.
Methods To Unroot Tecno Android Phones Using Framaroot Application
There is just one step to unroot your device.
Just Launch the app but select “unroot” from the options and then skip further.
It will automatically unroot your device.
You can follow up to the original thread at XDA-Developers to interact with the developer and other Framaroot users.
ReadMore..
That one click which i earlier said concerning rooting solution has to do with the use of a Framaroot apk file.
This Framaroot; put together by senior XDA forum member, Alephziancan can immediately give you root access to your phone by pushing the superuser and su binaries to your device.
Rooting your Tecno phones using Framaroot is reversible like chemical change and it is very straight forward unlike some many other complex methods out there. There is No need for PC and even if the app fails to root your phone, you will be notified and nothing will happen to your phone.
Just know that the application is already compatible with with a list of devices from various manufacturers and is capable to root an Android device running version 2.x to 4.x.
Anybody that wants to get his Tecno Phone rooted must note that "Rooting voids your warranty, perform all actions at your will and with extreme caution."
And note that blogspot.com or the developer shall not be held responsible for your damage to your device.
Steps To Root Tecno Android Phones With Framaroot app
Step 1. With your Android Tecno phone, go to Settings > Security and Check “Unknown Sources”
Step 2. Now just download latest version of framarootto your phone.
Step 3. Now go to your device’s app manager and tap on “Framaroot” to execute it.
Step 4. Then follow the onscreen instructions and the process will start.
Step 5. After the above step just, reboot the device. Which you will later get a successful message.
Do you know that;
Making use of root checker to see if your phone is rooted is advisable, just click on Root Checker, then click Verify root Access to check.
Methods To Unroot Tecno Android Phones Using Framaroot Application
There is just one step to unroot your device.
Just Launch the app but select “unroot” from the options and then skip further.
It will automatically unroot your device.
You can follow up to the original thread at XDA-Developers to interact with the developer and other Framaroot users.
»Feel Like A Gladiator Dhaka Gladiators Theme Song mp3 3 44mb
Download Files:
Feel Like A Gladiator Dhaka Gladiators Theme Song.mp3 (3.44mb)
Saturday, August 30, 2014

Samsung E2121 factory reset
Warning! All data will be lost!
Just type *2767*3855#
Wait until the phone restarts.
Here is video how to do:

Lg Optimus Net P690 data:
GSM frequencies :850 900 1800 1900
Standard UMTS :900 2100
Type :Touch
Dimensions (W x H x D) :113,50 x 59,00 x 12,10 mm
Weight :122,00 g
Main display :Color / TFT
256k colors
320 x 480 px (3.20") 180 ppi
Talk time (max.) :2G: 240 min. (4,0 h)
Stand-by (max.) :2G: 100 h. (4,2 days)
Standard battery :Li-Ion 1500 mAh
Internal memory :150 MB
Memory cards : microSD, microSDHC (up to 32 GB)
Operating system :Android 2.3 Gingerbread
Processor :Qualcomm MSM7227T
Processor clock :800 MHz
How to hard reset:
If you forgot your screen lock combination or password follow these steps.
Warning !All data will be lost!
1.Press together volume down + home button + power button
2.Release your fingers of the phone when Androis logo appear
3.Wait untiil format is complete and phone reboot
Here is video how to do:
Alcatel One Touch Scribe Easy 8000D Tips and Tricks
How to Backup and Factory Reset Alcatel One Touch Scribe Easy 8000D
Resetting your Alcatel One Touch Scribe Easy 8000D will restore the default settings of your device. It will also delete all your files on your phone, so it is recommended to backup all your important files on your computer.
Luckily in Alcatel One Touch Scribe Easy 8000D you can backup your phone settings and other application data to Google Servers before wiping all the data on your phone. But if you want to erase all the content on your phone, then there’s no need for you to backup your data.
How to Activate the Backup Function:
• Tap on the Menu key from Home screen.
• Select Settings > Backup & reset > Back up my data.
How to Factory Reset:
• Tap on the Menu key from Home screen.
• Select Settings > Backup & reset > Factory data reset.
• Then tap on Reset phone.
If you are unable to turn on your Alcatel One Touch Scribe Easy 8000D, then you may need to do the hard reset. Press and hold the Volume up key and the Power key at the same time until the screen light up. This process will also factory reset your device.
How to Turn On/Off Wi-Fi on Alcatel One Touch Scribe Easy 8000D
By connecting to a Wi-Fi network you can surf to the Internet using your One Touch Scribe Easy 8000D. Just make sure that you are within the range of a wireless network so you will be able to connect your successfully. You can used a Wi-Fi even without a SIM Card.
Follow these steps on how to connect to your wireless network:
• Tap and hold Recet app key from the Home screen, then select Settings.
• You will see a Wi-Fi option, beside on the Wi-Fi, just switch whether on/off.
• Tap on Wi-Fi, there should a detailed information of detected wireless networks.
• Tap on the network you want to connect with.
• If the network is secured with a password, make sure to enter the password correctly.
• Then tap Connect.
How to Extend Battery Life of Alcatel One Touch Scribe Easy 8000D
• Turn on the power-saving option on the device (if applicable).
• Lessen the screen brightness and the screen lock timeout.
• Turn down your device volume with the volume keys.
• Close any apps or features when you are done using it so they will not continuously running in the background.
• Turn off the network connection if you are out of range so that your device will stop searching for a network signal.
• You should use the latest version of the software update. Software updates improves some features and fixes some bugs on the previous software version.
• Turn off the camera flash.
How to Setup an Email Account on Alcatel One Touch Scribe Easy 8000D
Uses of Power Key of Alcatel One Touch Scribe Easy 8000D
• By pressing the Power Key it can Lock the screen / Light up the screen
• By pressing and holding the Power Key it can show the pop-up menu to select from Ringer mode / Airplane mode / Power off / Reboot / Power on
• Press the Power key more than 9 times to restart.
• Press the Power key and Volume up key to reset.
• Press the Power key and Volume down key to capture a screenshot.
How to Import, Export and Share Contacts
How to Turn on USB Tethering or Portable Wi-Fi hotspot
• Tap and hold Recet app key from the Home screen.
• Select Settings > More... > Tethering & portable hotspot.
• Mark the checkbox of USB tethering or Portable Wi-Fi hotspot to activate this function.
Just keep in mind that the functions may incur additional network charges from your network operator. Extra fees may also be charged in roaming areas.
How to Locate my Location using GPS Satellites
To activate your phone’s global positioning system (GPS) satellite Receiver:
• Tap and hold Recet app key from Home screen.
• Select Settings > Location access.
• Tap to switch beside Access to my location to turn on.
When open Maps, you can find your location:
ReadMore..
Resetting your Alcatel One Touch Scribe Easy 8000D will restore the default settings of your device. It will also delete all your files on your phone, so it is recommended to backup all your important files on your computer.
Luckily in Alcatel One Touch Scribe Easy 8000D you can backup your phone settings and other application data to Google Servers before wiping all the data on your phone. But if you want to erase all the content on your phone, then there’s no need for you to backup your data.
How to Activate the Backup Function:
• Tap on the Menu key from Home screen.
• Select Settings > Backup & reset > Back up my data.
How to Factory Reset:
• Tap on the Menu key from Home screen.
• Select Settings > Backup & reset > Factory data reset.
• Then tap on Reset phone.
If you are unable to turn on your Alcatel One Touch Scribe Easy 8000D, then you may need to do the hard reset. Press and hold the Volume up key and the Power key at the same time until the screen light up. This process will also factory reset your device.
How to Turn On/Off Wi-Fi on Alcatel One Touch Scribe Easy 8000D
By connecting to a Wi-Fi network you can surf to the Internet using your One Touch Scribe Easy 8000D. Just make sure that you are within the range of a wireless network so you will be able to connect your successfully. You can used a Wi-Fi even without a SIM Card.
Follow these steps on how to connect to your wireless network:
• Tap and hold Recet app key from the Home screen, then select Settings.
• You will see a Wi-Fi option, beside on the Wi-Fi, just switch whether on/off.
• Tap on Wi-Fi, there should a detailed information of detected wireless networks.
• Tap on the network you want to connect with.
• If the network is secured with a password, make sure to enter the password correctly.
• Then tap Connect.
Battery Life depends on how you use your device. For One Touch Scribe Easy 8000D device, if you want to save your battery to last longer hours, you may need to adjust your settings. Follow these suggestions:
• Turn on the power-saving option on the device (if applicable).
• Lessen the screen brightness and the screen lock timeout.
• Turn down your device volume with the volume keys.
• Close any apps or features when you are done using it so they will not continuously running in the background.
• Turn off the network connection if you are out of range so that your device will stop searching for a network signal.
• You should use the latest version of the software update. Software updates improves some features and fixes some bugs on the previous software version.
• Turn off the camera flash.
You can set-up an external POP3 or IMAP email accounts on your One Touch Scribe Easy 8000D. But for me, I recommend using the Gmail account which is powered by Google, and where you can back up your applications.
How to setup your an email, follow these steps:
• On your Homescreen, touch on the Application tab.
• There should an email wizard that will guide you through process in setting up an email.
• Enter the email address and password of the account you want to set-up.
• Then tap Next. (You will be prompted to go to email account settings to enter settings manually, if the account is not provided by your service provider.)
• You can also tap on Manual setup to directly enter the incoming and outgoing settings for the email account you are setting up.
• Enter your preferred account name and display name in outgoing emails.
• If you want to add another email account, just tap on Menu key > Settings > Add Account on the right of the title to create.
Uses of Power Key of Alcatel One Touch Scribe Easy 8000D
• By pressing the Power Key it can Lock the screen / Light up the screen
• By pressing and holding the Power Key it can show the pop-up menu to select from Ringer mode / Airplane mode / Power off / Reboot / Power on
• Press the Power key more than 9 times to restart.
• Press the Power key and Volume up key to reset.
• Press the Power key and Volume down key to capture a screenshot.
How to Import, Export and Share Contacts
- On your Contacts screen, tap on the Menu icon to view the options.
- Tap on Import/Export.
- Select Import from SIM card if you want to import from your SIM card.
- Select Export to SIM card if you want to export.
- Select Import from storage if the contacts if from your storage, or Export to storage.
- Or select Share visible contacts.
How to Turn on USB Tethering or Portable Wi-Fi hotspot
• Tap and hold Recet app key from the Home screen.
• Select Settings > More... > Tethering & portable hotspot.
• Mark the checkbox of USB tethering or Portable Wi-Fi hotspot to activate this function.
Just keep in mind that the functions may incur additional network charges from your network operator. Extra fees may also be charged in roaming areas.
How to Locate my Location using GPS Satellites
To activate your phone’s global positioning system (GPS) satellite Receiver:
• Tap and hold Recet app key from Home screen.
• Select Settings > Location access.
• Tap to switch beside Access to my location to turn on.
When open Maps, you can find your location:
Friday, August 29, 2014

iPhone4 after water damage not recognize the BaseBand chip
iPhone4 after water damage not recognize the BaseBand chip ,check the components :L2_RF/L3_RF/FL6_RF/FL8_RF

How to Root US Cellular Samsung Galaxy S3
Here you can find all the instructions that you need to take in order to successfully root your US Cellular variant of Galaxy S3 smartphone with the Qualcomm 1.5 GHZ CPU. Make sure that you read the entire post and only when you’re sure that you know what you’re doing, you should proceed to apply all the actions I’ve listed in this post.
In order to be able to root your device correctly, you will first need to read the preparation guide. There you will find several tricks on how to make sure that you will manage to root your US Cellular Galaxy S3 at your first attempt. Rooting your device is easy and you should be able to do it easily without too much trouble. Also, note that this guide will install the CWM Recovery image, which you can use to flash new custom ROMs.
Now you should move to the tutorial guide. Note that you shouldn’t attempt to flash the root without reading the instructions below:
Remember that this guide is for advanced users. Also, note that now you can easily flash new custom ROMs for your Galaxy S3, which means that you can get rid of all the Samsung / US Cellular bloat files.
ReadMore..
In order to be able to root your device correctly, you will first need to read the preparation guide. There you will find several tricks on how to make sure that you will manage to root your US Cellular Galaxy S3 at your first attempt. Rooting your device is easy and you should be able to do it easily without too much trouble. Also, note that this guide will install the CWM Recovery image, which you can use to flash new custom ROMs.
Now you should move to the tutorial guide. Note that you shouldn’t attempt to flash the root without reading the instructions below:
- This guide works with the US Cellular variant of Galaxy S3 model number SCH R530. Check this info in the ‘About device’ menu under Settings app. Do not attempt to flash these files on any other smartphone.
- Enable USB debugging option from the Android Development menu.
- Install the Samsung USB Drivers. Without these installed, your device will not be recognized by the computer and you cannot root the phone.
- You can choose to move all important data files on your computer, so that you won’t risk losing any of them in the process.
- Charge the smartphone battery until it reaches at least 50% power level, which will prevent the device from switching off.
- Disable all the running antivirus and security programs currently running on your PC, as these will interfere with the root actions.
- Read the entire tutorial and only if you’re an advanced user you should apply the actions listed in it.
- Please note that we cannot be held responsible in case your device gets bricked in the process. You’re taking these actions at your own risk and you shouldn’t try to root your phone if you’re a novice.
How to root and install CWM Recovery for US Cellular Samsung Galaxy S3:
- Download the Root zip file from HERE. Unzip its contents and save them in a folder on your computer’s desktop screen.
- Connect your US Cellular SGS3 with your PC and make sure that the ‘Media device(MTP)’ is set as default USB PC Connection.
- Open the unzipped folder and copy the ‘SuperUser.zip’ file on your phone’s internal SD card. This file will be used later.
- Disconnect the phone from computer. Power it off.
- Boot into Download Mode by pressing ‘volume down’ + ‘home’ + ‘power’ buttons. Release the buttons when the screen powers ON. You will see a warning screen which tells you to press Volume Up, do it and the Download Mode will boot.
- Now connect your device to your PC via USB Cable.
- Go to the unzipped folder created at step 1 and launch the ODIN executable.
- When ODIN launches, you should click on ‘PDA’. Browse for the ‘RecoveryGalaxyS3USCanada.tar’ file. Load it.
- In ODIN make sure that the ‘auto-reboot’ option is disabled. Now you can hit the ‘START’ button. The CWM Recovery image has been flashed and ODIN will say ‘PASS!’. Move to the next step.
- Disconnect your device from PC and remove its battery.
- Place the battery back in its place and then boot into ClockworkMod Recovery. It can be done by pressing at the same time ‘volume up’ + ‘home’ + ‘power’ buttons. Release the buttons when the CWM Recovery screen appears.
- Select ‘install zip from sdcard’ and then select ‘choose zip from internal sdcard’. Browse for the ‘SuperUser.zip’ file and confirm that you want to install it.
- Return to the main recovery screen and select ‘reboot system now’. Now your smartphone will reboot and after the boot is complete you should be taken to your device’s welcome screen.
- That should be all, you’ve successfully rooted your device and installed CWM Recovery. Check the app drawer for the SuperSU app icon, as its presence will confirm that the root was completed.
Remember that this guide is for advanced users. Also, note that now you can easily flash new custom ROMs for your Galaxy S3, which means that you can get rid of all the Samsung / US Cellular bloat files.

Thursday, August 28, 2014
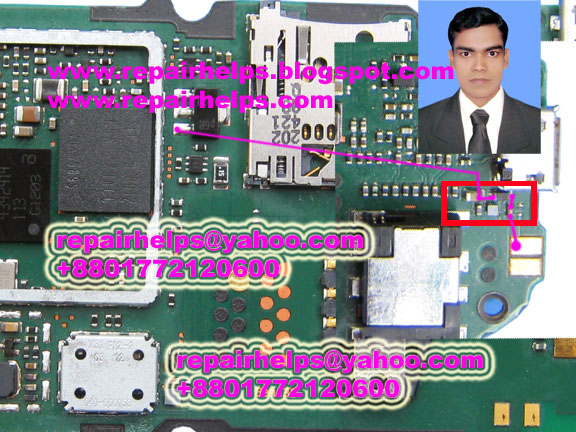
Nokia 2690 Sim card not accepted Problem with Jumper Solution
Nokia 2690 Sim card not accepted solution.
![Nokia]()
ReadMore..

Iphone charge no response solution tested 100
iPhone Check Warranty Unlock
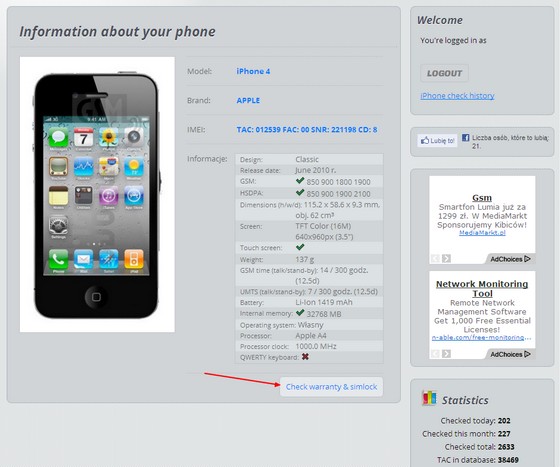
iPhone iPad Check Warranty unlock function allows to check which network is the iPhone and check simlock status. This information is needed to order unlock service. Checking is done on the basis of the IMEI number. Information comes directly from Apple base.
iPhone iPad Check Warranty unlock function allows to check which network is the iPhone and check simlock status. This information is needed to order unlock service. Checking is done on the basis of the IMEI number. Information comes directly from Apple base.
After entering and checking the IMEI number, click Check Warranty Unlock (below the phones data). A moment later we get the following data:
- The network on Which the phone is locked
- Serial number
- Color / capacity
- The warranty period
- The current version of the software

Android 4 4 2 update for Nexus 4 Nexus 5 Nexus 7 and Nexus 10
its not just been a complete week since we heard rumors of Google rolling out the Android 4.4.1 update to multiple nexus devices, today Google has secretly started rolling out a new Android 4.4.2 update for the Nexus devices. Google has yet to make an official announcement on this but we hope to from Google very soon. ![180196]()
ReadMore..
With two consecutive updates being lined up for the Nexus devices, it seems some users might skip the Android 4.4.1 update and get directly updated to Android 4.4.2. it might be strange to see an update within less than a week after the android 4.4.2 update, but it seems google might have found a flaw in the previous update, which is why Google has swiftly rolled out the new Android 4.4.2 update to fix any issues in the previous firmware update.
As of now there has been no official change log but sprint seems to have confirmed the change log details for the new Android 4.4.2 update.
Enhancements/Fixes
- - Fix for clearing the VM Indicator
- - Fix for delivery of the VM Indicator
- - Various additional software fixes
- - Security enhancements
The Android 4.4.2 OTA update has already begun rolling out to supported nexus devices. For those who cant wait, you can manually flash the new update on your nexus device. Thanks to Androidpolice, Below are the Android 4.4.2 download links for your respective nexus devices.
Android 4.4.2 Download Links
Nexus 4
- 4.4 -> 4.4.2: occam KOT49H from KRT16S
- 4.4.1 -> 4.4.2: occam KOT49H from KOT49E
Nexus 5
- 4.4 -> 4.4.2: hammerhead KOT49H from KRT16M
- 4.4.1 -> 4.4.2: hammerhead KOT49H from KOT49E
2012 Nexus 7 Wi-Fi
- 4.4 -> 4.4.2: nakasi KOT49H from KRT16S
2012 Nexus 7 3G
- 4.4 -> 4.4.2: nakasig KOT49H from KRT16S
2013 Nexus 7 Wi-Fi
- 4.4 -> 4.4.2: razor KOT49H from KRT16S
- 4.4.1 -> 4.4.2: razor KOT49H from KOT49E
2013 Nexus 7 LTE
- 4.4 -> 4.4.2: razorg KOT49H from KRT16S
- 4.4.1 -> 4.4.2: razorg KOT49H from KOT49E
Nexus 10
- 4.4 -> 4.4.2: mantaray KOT49H from KRT16S
- 4.4.1 -> 4.4.2: mantaray KOT49H from KOT49E
T Mobile LG G2 D801 Using Android 4 4 2 KitKat PAC man ROM How To Install Guide
T-Mobile LG G2 D801 can be updated to latest Android 4.4.2 KitKat. The upgrade is possible with the help of custom ROM PAC-man. The development team of PAC-man ROM finally introduced Android 4.4.2 KitKat based PAC-man ROM for T-Mobile LG G2 D801. Which means, you can download and install custom firmware PAC-man to update your T-Mobile LG G2 D801 to latest Android 4.4.2 KitKat. T-Mobile LG G2 D801 comes with good hardware spec, hence is capable to run PAC-man smoothly. PAC-man ROM consist various features of Paranoid Android, AOKP and CyanogenMod. The link Im sharing is PAC-man nightly build. The good thing about nightly build is, you will receive update daily and bugs are fixed faster as well as new feature introduced regularly. Continue reading this guide to know how to install Android 4.4.2 KitKat based PAC-man custom ROM on T-Mobile LG G2 D801.
PAC-man comes with various useful customization. Since, PAC-man is based on Android 4.4.2 KitKat, you may like to know whats new on it. Some of the cool Android 4.4.2 KitKat features that you will enjoy is Screen Recording, Tap to Pay (Google Wallet for everyone), NFC emulation for non nfc devices, 14% less memory usage, cloud printing from Gallery, Google Home is the new Launcher, Core System Processes Trimmed, apps are efficient and responsive on all devices, the all new procstats tool details memory use, Full-screen Immersive mode, seamless change in resolution during media playback, Phone dialer got local business detection, redesigned Quickoffice and many more.
Please note, not all Android 4.4.2 KitKat feature yet ported to PAC-man ROM.

Another thing you should note, this is nightly build, hence expect some bugs in it. All bugs and issues expected to be fixed as development progress towards a stable PAC-man build.
Warning!
This tutorial is only for T-Mobile LG G2 D801. Don’t try this guide on any other Android device. Also, we (Android Pulp Team) are not responsible for any damage caused due to the instruction given in this page. Try this at your own risk. However, it is very unlikely that your device will be damaged if you follow all the instructions as it is which are mentioned in procedure.
Pre Requisites:
1. ROM flashing require you to wipe your internal memory data, hence you required to backup your device data. You can follow our ultimate backup guide.
2. Make sure your device have at least 60% battery power. If your phone shut down during installation then there is good chance to brick your device.You can install an app like Battery Notifier BT Free on your Android device to check it easily.
3. You must have USB Driver Installed for T-Mobile LG G2 D801 in your PC. [Download USB Drivers]
4. Make sure USB Debugging is enabled otherwise its wont be possible to transfer file between PC and T-Mobile LG G2 D801. [Guide].
5. Your device have latest CWM version 6.0.4.4 and up or TWRP 2.6.3.1 and up installed. [General Guide]
If you done everything that we mentioned above then you are ready to follow step-by-step guide on how to install Android 4.4.2 KitKat based PAC-man ROM on T-Mobile LG G2 D801.
File Required(Download by clicking on it)
ReadMore..
PAC-man comes with various useful customization. Since, PAC-man is based on Android 4.4.2 KitKat, you may like to know whats new on it. Some of the cool Android 4.4.2 KitKat features that you will enjoy is Screen Recording, Tap to Pay (Google Wallet for everyone), NFC emulation for non nfc devices, 14% less memory usage, cloud printing from Gallery, Google Home is the new Launcher, Core System Processes Trimmed, apps are efficient and responsive on all devices, the all new procstats tool details memory use, Full-screen Immersive mode, seamless change in resolution during media playback, Phone dialer got local business detection, redesigned Quickoffice and many more.
Please note, not all Android 4.4.2 KitKat feature yet ported to PAC-man ROM.
Another thing you should note, this is nightly build, hence expect some bugs in it. All bugs and issues expected to be fixed as development progress towards a stable PAC-man build.
Warning!
This tutorial is only for T-Mobile LG G2 D801. Don’t try this guide on any other Android device. Also, we (Android Pulp Team) are not responsible for any damage caused due to the instruction given in this page. Try this at your own risk. However, it is very unlikely that your device will be damaged if you follow all the instructions as it is which are mentioned in procedure.
Pre Requisites:
1. ROM flashing require you to wipe your internal memory data, hence you required to backup your device data. You can follow our ultimate backup guide.
2. Make sure your device have at least 60% battery power. If your phone shut down during installation then there is good chance to brick your device.You can install an app like Battery Notifier BT Free on your Android device to check it easily.
3. You must have USB Driver Installed for T-Mobile LG G2 D801 in your PC. [Download USB Drivers]
4. Make sure USB Debugging is enabled otherwise its wont be possible to transfer file between PC and T-Mobile LG G2 D801. [Guide].
5. Your device have latest CWM version 6.0.4.4 and up or TWRP 2.6.3.1 and up installed. [General Guide]
If you done everything that we mentioned above then you are ready to follow step-by-step guide on how to install Android 4.4.2 KitKat based PAC-man ROM on T-Mobile LG G2 D801.
File Required(Download by clicking on it)
- PAC-man For T-Mobile LG G2 D801 [Filename: pac_d801-nightly-20140514.zip]
- Google Apps [Filename: pa_gapps-stock-4.4.2-20140207-signed.zip]
- Connect your device to PC using USB cable and then copy downloaded files to the SD card of your device. Important: Don’t extract any files.
- Disconnect USB and then turn off your T-Mobile LG G2 D801.
- Now, boot into recovery mode. To do so, press and hold Volume down & Power, when the LG logo appears release and press them again, then press the Power button three times! In recovery use Volume Keys to navigate between option and Power button to select an option. Alternatively try this: Recovery Mode without Key Combination.
- Perform a Nandroid backup of your existing ROM that you can restore later if this new ROM not work or you want to go back into your previous ROM. To perform a backup, select Backup and Restore, then on the next screen, select Backup again. Go back to main recovery menu after backup is complete.
- Now, perform data wiping task. To do so, select wipe data/factory reset, then select Yes on next screen to confirm your action. Wait few minutes till the data wipe is complete. Now come back to CWM recovery main menu. Select wipe cache partition and after wiping process done, select Wipe Dalvik Cache under advance option to perform Dalvik cache wiping.
- Select install zip from sdcard, then select choose zip from sdcard. Now, locate the PAC-man Zip file that you copied earlier in Step 1 and select it by pressing Power button. Confirm installation by selecting Yes – Install _____.zip on the next screen. The ROM installation will begin.
- Once the ROM installation process end, repeat the step 6 but choose the pa_gapps-stock-4.4.2-20140207-signed.zip file instead of ROM zip to install the Google apps package.
- When installation is completed, go back to the main recovery menu and select reboot system now to reboot your T-Mobile LG G2 D801 and boot up into Android 4.4.2 KitKat ROM PAC-man.
- Returning to Previous ROM: To go back to your previous ROM, boot into recovery, select backup and restore then restore your previous ROM by selecting it from the list.
- Connect your device to PC using USB cable and then copy downloaded files to the SD card of your device. Important: Don’t extract any files.
- Disconnect USB and then turn off your T-Mobile LG G2 D801.
- Now, boot into recovery mode. To do so, press and hold Volume down & Power, when the LG logo appears release and press them again, then press the Power button three times! Alternatively try this: Recovery Mode without Key Combination.
- Create a Backup using TWRP Backup Option.
- Perform a Factory Reset (this will delete all apps and their settings and game progress). To do this, Tap on Wipe, then at the bottom of the screen do a Swipe on the ‘Swipe to factory reset‘ option.
- Now its time to add zip file for flashing. Tap on Install, then browse to the location where you saved the files and tap on the PAC-man Zip file. Then tap on Add More Zips, and add pa_gapps-stock-4.4.2-20140207-signed.zip. Now at the bottom of the screen, do a swipe on the Swipe to confirm flash option to begin flashing.
- When installation is completed, go back to the main recovery menu and tap on Reboot and then, tap on System to reboot your T-Mobile LG G2 D801 and boot up into Android 4.4.2 KitKat ROM PAC-man.
- Returning to Previous ROM: To go back to your previous ROM, boot into recovery, select Backup then through Restore option, restore your previous ROM by selecting it from the list.
Wednesday, August 27, 2014
Nokia 1800 charging solution
Nokia 1800 phone charging solution is very common problem.Charging is the very important part of mobile phone.Now I share how to solve this problem.View the below picture and read the below note.
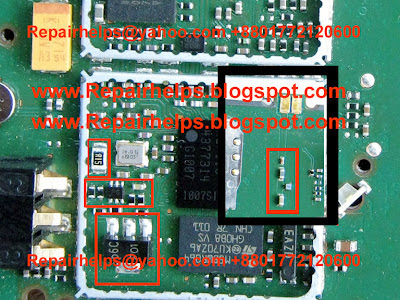
How to do this work : First check charging port if ok next check fuse and diode if damage one of them replace that.If they are ok but problem still then check charging transistor and red mark parts following above picture.
How to do this work : First check charging port if ok next check fuse and diode if damage one of them replace that.If they are ok but problem still then check charging transistor and red mark parts following above picture.
Samsung S8500 wive Camera Not Working fix problem

Ways How to Fix problem,Samsung S8500 wive Camera Not Working Line Jumper How to Fix problem,Samsung S8500 wive Camera Not Working Repair How to Fix problem,Samsung S8500 wive Camera Not Working Procedure Shown On REd Marked On Diagram How to Fix problem,How To Working Samsung S8500 wive Camera Not Working How to Fix problem Procedure Here Step By Step Guide.
Nokia Lumia 525 Tips and Tricks
How to Hard Reset Nokia Lumia 525
There are two ways on how to reset your Nokia Lumia 525, it can be through the hard reset or soft reset. When you say hard reset it involves on the hardware part, so you need to remove the battery of you Nokia Lumia and reinsert it. Then turn on your device normally. This should refresh the content of your device but will not remove any data.
Software reset will return your device to its default settings. Like a brand new phone, no information or data saved on your device. This procedure will erase all your data save on your phone.
If your Nokia Lumia is frozen, it is recommended to perform the Hard Reset.
You can soft reset your Nokia Lumia in two ways. By accessing it through settings or doing the hard key combination.
Resetting through the settings:
Go to Settings > About > reset your phone.
Hard Key Combination:
Use this option if your device is locked and you dont know the code.
Note: Make sure that your Nokia Lumia is turned off.
Step 1. Press and hold the power key until it vibrates then release.
Step 2. Press and hold the down key volume. If the exclamation mark will be shown on the screen, you can now release the button.
Step 3. You need to input these key combination:
Volume Up > Volume Down > Power > Volume Down.
Your phone will reset and will boot up automatically. This might take a several minutes.
How to Import Contacts From Old Phone to New Phone (on iPhone, Samsung, HTC and Nokia)
Contacts is very important for everyone of us. We cant connect to our friends without a contact number. If you have a new phone, saving contacts on the phone one by one is so hassle. But now, theres an easy way how to transfer or import your contacts from your old phone to your new phone.
Use your PC to transfer contacts to your new phone. This process is applicable in several phone brands, including iPhone, Samsung, HTC and Nokia.
You just need an Internet Connection on your PC, your old and new phone and their own USB cable.
If you are not prompted with a pop-up window to install the PC Companion, you can also download the PC Companion here.
How to Extend Battery Life of Nokia Lumia 525
Battery Life depends on how you use your device. For Nokia Lumia 525 device, if you want to save your battery to last longer hours, you may need to adjust your settings. Follow these suggestions:
• Turn on the power-saving option on the device. Then lessen the screen brightness and the screen lock timeout. On the Home Screen, swipe left, then tap on the Gear Icon or Settings > Battery saver.
- Be reminded that when your phone goes into battery saver mode, you may not be able to change the settings of all apps.
- If you want to change the settings of the Battery saver, tap on Advanced.
• Turn down your device volume with the volume keys.
• Close any apps or features when you are done using it so they will not continuously running in the background.
• Turn off the network connection if you are out of range so that your device will stop searching for a network signal.
• You should use the latest version of the software update. Software updates improves some features and fixes some bugs on the previous software version.
• Turn off the camera flash.
• The camera viewfinder can be a power drain, so after youve finished taking photos, press the left arrow key.
How to Take a Screenshot on Nokia Lumia 525
Did you just created a nice piece of art on your new Nokia Lumia 525 phone? Or perhaps youve just personalized your screen and want others to know how youve come up with it.Well, take a screenshot and brag it to your friends. Heres how you can capture a screenshot of your Nokia device.
How to Personalize the Start Screen on Nokia Lumia 525
Do you want to get easy access on your most-used apps? Then pin your favorite apps, websites, contacts and much more right on your Nokia Lumia 525 start screen. Here are some ways on how you can personalize your start screen and make it look neater.
To pin an app:
1. On your devices screen swipe left to go to the apps menu.
2. Then tap and hold the app you wish to pin on the start screen.
3. And tap pin to Start.
To pin a contact:
1.First tap People.
2. Then tap and hold the contact you wish to pin on the start screen.
3. And tap pin to start. By pinning your a contact on the start screen, youll be able
to see their feed updates on the tile and you can call them directly from the
start screen.
To pin a website:
1. Go to a website that you want to access instantly .
2. Then tap and choose pin to start.
To move a tile:
1. Just tap and hold the tile.
2. Then drag and drop it to the new location and finally tap the screen.
To resize a tile:
1. Tap and hold the tile you want to resize
2. And tap the arrow icon.
To unpin a tile:
1. Tap and hold the tile.
2. And tap
How to Download Maps on Nokia Lumia 525
Are you a certified travel addict? Then why not download and save maps of your destinations right on your phone before you hit the road. By doing this, you can travel the world while browsing your map guide even without an internet connection. Here are the steps on how you can download maps on Nokia Lumia 525.
1. On your devices start screen, swipe left and tap![Nokia]() Here Maps, then tap on
Here Maps, then tap on .
.
2. Now select on download maps. Make sure that youre WiFi is on and is connected to a network.
3. After tapping download maps, tap and select the country or region.
To delete a map just tap download new maps. Then tap and hold the map you wish to get rid of and finally tap on delete.
How to Download Apps on Nokia Lumia 525
Do want to jampacked your Lumia 525 with cool apps and games. Then try checking out their own version of app store to download free apps, games and other stuff for your Lumia 525 phone. Heres how to download those stuff on your phone.
1. First tap the Store icon on your device.
2. Then tap an item to view its details like the price, description, rating and etc.
3. If the said item has a price, tap buy or if its available for free at a limited time, tap try. If its free, go ahead and tap install.
4. If youre not signed in to a Microsoft account, then sign in now.
5. And just follow the on-screen instructions to complete the download.
When the download is complete, you can open or view the item, or continue browsing for more items at the store. But even if youre still downloading the item, you can continue to browse for more items and even add an item to your download queue. To view your download queue just tap the download notification at the bottom of the main view. If you want to pause the downloading, tap and hold the downloading item and tap pause. Tap resume to continue the download.
How to Create a Start Screen for Kids on Nokia Lumia 525
ReadMore..
There are two ways on how to reset your Nokia Lumia 525, it can be through the hard reset or soft reset. When you say hard reset it involves on the hardware part, so you need to remove the battery of you Nokia Lumia and reinsert it. Then turn on your device normally. This should refresh the content of your device but will not remove any data.
Software reset will return your device to its default settings. Like a brand new phone, no information or data saved on your device. This procedure will erase all your data save on your phone.
If your Nokia Lumia is frozen, it is recommended to perform the Hard Reset.
You can soft reset your Nokia Lumia in two ways. By accessing it through settings or doing the hard key combination.
Resetting through the settings:
Go to Settings > About > reset your phone.
Hard Key Combination:
Use this option if your device is locked and you dont know the code.
Note: Make sure that your Nokia Lumia is turned off.
Step 1. Press and hold the power key until it vibrates then release.
Step 2. Press and hold the down key volume. If the exclamation mark will be shown on the screen, you can now release the button.
Step 3. You need to input these key combination:
Volume Up > Volume Down > Power > Volume Down.
Your phone will reset and will boot up automatically. This might take a several minutes.
How to Import Contacts From Old Phone to New Phone (on iPhone, Samsung, HTC and Nokia)
Contacts is very important for everyone of us. We cant connect to our friends without a contact number. If you have a new phone, saving contacts on the phone one by one is so hassle. But now, theres an easy way how to transfer or import your contacts from your old phone to your new phone.
Use your PC to transfer contacts to your new phone. This process is applicable in several phone brands, including iPhone, Samsung, HTC and Nokia.
You just need an Internet Connection on your PC, your old and new phone and their own USB cable.
Then you need to install the PC Companion program. This is a free application and the installation files are already saved on your new phone. This program can also be used in updating your phone software.
Please note that if you are using the Microsoft Windows 7 operating system on your PC, make sure that the AutoPlay setting is enabled.
To check your settings:
Click Start > Control Panel, then type "autoplay" on the search box. Click the AutoPlay, and mark the check box Use AutoPlay for all media and devices.
Installing the PC Companion:
Installing the PC Companion:
- Turn on your new Phone and connect it to your PC.
- On your new Phone, tap "Install" to install PC Companion on the PC.
- On your computer, if a pop-up window that appears notifies you about available PC Software, select Run Startme.exe.
- Then click Install to start the installation and then follow the instructions to complete the installation.
If you are not prompted with a pop-up window to install the PC Companion, you can also download the PC Companion here.
Transferring your contacts to your new phone:
- Make sure that PC Companion is installed on your PC.
- Open the PC Companion application on your PC.
- Then click Contacts Setup and follow the instructions to transfer your contacts.
How to Extend Battery Life of Nokia Lumia 525
Battery Life depends on how you use your device. For Nokia Lumia 525 device, if you want to save your battery to last longer hours, you may need to adjust your settings. Follow these suggestions:
• Turn on the power-saving option on the device. Then lessen the screen brightness and the screen lock timeout. On the Home Screen, swipe left, then tap on the Gear Icon or Settings > Battery saver.
- Be reminded that when your phone goes into battery saver mode, you may not be able to change the settings of all apps.
- If you want to change the settings of the Battery saver, tap on Advanced.
• Turn down your device volume with the volume keys.
• Close any apps or features when you are done using it so they will not continuously running in the background.
• Turn off the network connection if you are out of range so that your device will stop searching for a network signal.
• You should use the latest version of the software update. Software updates improves some features and fixes some bugs on the previous software version.
• Turn off the camera flash.
• The camera viewfinder can be a power drain, so after youve finished taking photos, press the left arrow key.
How to Take a Screenshot on Nokia Lumia 525
Did you just created a nice piece of art on your new Nokia Lumia 525 phone? Or perhaps youve just personalized your screen and want others to know how youve come up with it.Well, take a screenshot and brag it to your friends. Heres how you can capture a screenshot of your Nokia device.
1. Press on the Power key on the right side of the phone and the Start key simultaneously for a few seconds.
2. To see the screenshot, tap on Photos, the Albums and select Screenshots.
3. Tap and hold the screenshot you wish to send and then tap on share on the options.
There you have it. Youve just captured a screenshot.
How to Scan Codes on Nokia Lumia 525
Nokias latest installment of smartphone, the Lumia 525, allows you to scan QR codes, barcodes and book and DVD covers. Your device will give you further info after you scan the codes. Heres how you can make use of this feature.
1. First, you need to tap the Search icon
2. Then tap on
3. And point the camera at the code. Make sure to keep the camera steady on the code and should be completely visible in the camera viewfinder.
How to Make a Conference Call on Nokia Lumia 525
Now, if you want to have a private conversation with someone while youre on a conference call, just tap
How to Make Your Nokia Lumia 525 a Wi-Fi Hotspot
Ever imagine how you can make your own Nokia Lumia 525 a WiFi hotspot? Well, sure you can. This feature allows for your other devices to pick up your mobile hotspot settings on your Nokia Lumia 525. This is more preferable when you’re in public trying to locate a WiFi connection. Nokia did not mention how many devices can connect to your Nokia Lumia 525, but usually it is 6-8 devices. Check out these steps for easy, convenient and a money-saver internet experience.
1. On your Start screen, swipe left, and tap Settings.
Wait for few seconds and your phone will start broadcasting its WiFi network name. Now you’re ready to connect your other device to your portable mobile wifi hotspot.
How to Scan Codes on Nokia Lumia 525
Nokias latest installment of smartphone, the Lumia 525, allows you to scan QR codes, barcodes and book and DVD covers. Your device will give you further info after you scan the codes. Heres how you can make use of this feature.
1. First, you need to tap the Search icon
2. Then tap on
3. And point the camera at the code. Make sure to keep the camera steady on the code and should be completely visible in the camera viewfinder.
How to Make a Conference Call on Nokia Lumia 525
Conference calling is a network service. The maximum number of participants involve in a conference call varies by network service provider. Nokia Lumia 525 supports conference call between two or more people. Well, heres how you can make a conference call using your Nokia Lumia 525 phone.
1. Call the first participant of the conference call.
2. To make a call to another person, press  , and make the call in the normal way.
3. When your call is answered, just tap ![merge]() .
.
4. If you want to add another person to the call, just tap ![add]() , then call another person and tap
, then call another person and tap ![merge]() .
.
, and make the call in the normal way.Now, if you want to have a private conversation with someone while youre on a conference call, just tap![private]() and the persons name or number. The conference call is put on hold while other participants continue the conference call. Tap on
and the persons name or number. The conference call is put on hold while other participants continue the conference call. Tap on![merge]() to return to the conference call.
to return to the conference call.
How to Make Your Nokia Lumia 525 a Wi-Fi Hotspot
Ever imagine how you can make your own Nokia Lumia 525 a WiFi hotspot? Well, sure you can. This feature allows for your other devices to pick up your mobile hotspot settings on your Nokia Lumia 525. This is more preferable when you’re in public trying to locate a WiFi connection. Nokia did not mention how many devices can connect to your Nokia Lumia 525, but usually it is 6-8 devices. Check out these steps for easy, convenient and a money-saver internet experience.
1. On your Start screen, swipe left, and tap
2. Then select Internet sharing.
3. Switch the Sharing to On.
4. If you want to change the name of your connection, tap Setup > Broadcast name, then enter the name.
3. Switch the Sharing to On.
4. If you want to change the name of your connection, tap Setup > Broadcast name, then enter the name.
5. If you want to secure your Wi-Fi hotspot, then you can also type in a password for the connection.
6. Then select the connection on the other device.
Wait for few seconds and your phone will start broadcasting its WiFi network name. Now you’re ready to connect your other device to your portable mobile wifi hotspot.
Note: The other device uses data from your data plan, which may result in data traffic costs. For info on availability and costs, contact your network service provider.
How to Find a Lost Nokia Lumia 525
Losing a phone is sort of a matter of life and death these days especially if you have confidential files on it. If you misplaced your phone or someone has stolen it, then keep calm and follow the steps below so you can locate your phone and lock or delete all data on it remotely. All you need to have is a Microsoft account on your phone.
1. On your computer, laptop or tablet, go to www.windowsphone.com
2. Then sign in using the same Microsoft account as on your phone.
3. Choose find my phone. From there you can:
> locate your phone on a map
> make your phone ring even if its in silent mode
> lock your phone and set it to show a message so it can be returned to you
> delete all data from your phone remotely
How to Uninstall an App on Nokia Lumia 525
Deleting apps on your phone can free up your phone memory storage. So if think youre phone is a bit too crowdy and if some apps lurking in it deserves to be out of your phone memory then you might want to consider uninstalling those apps you no longer want to use. Heres how you can clean up and uninstall an app on Nokia Lumia 525.
1. On your devices start screen, swipe left to the all apps menu.
2. Then simply tap and hold an app and tap uninstall. Take note that you might not be able to remove some apps especially those that came with your phone.
As easy as that. If you wish to reinstall the app without buying it again, then you can do as as long as it is available in Store.
How to Personalize the Start Screen on Nokia Lumia 525
Do you want to get easy access on your most-used apps? Then pin your favorite apps, websites, contacts and much more right on your Nokia Lumia 525 start screen. Here are some ways on how you can personalize your start screen and make it look neater.
To pin an app:
1. On your devices screen swipe left to go to the apps menu.
2. Then tap and hold the app you wish to pin on the start screen.
3. And tap pin to Start.
To pin a contact:
1.First tap
People.2. Then tap and hold the contact you wish to pin on the start screen.
3. And tap pin to start. By pinning your a contact on the start screen, youll be able
to see their feed updates on the tile and you can call them directly from the
start screen.
To pin a website:
1. Go to a website that you want to access instantly .
2. Then tap
and choose pin to start.To move a tile:
1. Just tap and hold the tile.
2. Then drag and drop it to the new location and finally tap the screen.
To resize a tile:
1. Tap and hold the tile you want to resize
2. And tap the arrow icon.
To unpin a tile:
1. Tap and hold the tile.
2. And tap
How to Download Maps on Nokia Lumia 525
Are you a certified travel addict? Then why not download and save maps of your destinations right on your phone before you hit the road. By doing this, you can travel the world while browsing your map guide even without an internet connection. Here are the steps on how you can download maps on Nokia Lumia 525.
1. On your devices start screen, swipe left and tap
.2. Now select on download maps. Make sure that youre WiFi is on and is connected to a network.
3. After tapping download maps, tap
and select the country or region.To delete a map just tap download new maps. Then tap and hold the map you wish to get rid of and finally tap on delete.
How to Download Apps on Nokia Lumia 525
Do want to jampacked your Lumia 525 with cool apps and games. Then try checking out their own version of app store to download free apps, games and other stuff for your Lumia 525 phone. Heres how to download those stuff on your phone.
1. First tap the Store icon
on your device.2. Then tap an item to view its details like the price, description, rating and etc.
3. If the said item has a price, tap buy or if its available for free at a limited time, tap try. If its free, go ahead and tap install.
4. If youre not signed in to a Microsoft account, then sign in now.
5. And just follow the on-screen instructions to complete the download.
When the download is complete, you can open or view the item, or continue browsing for more items at the store. But even if youre still downloading the item, you can continue to browse for more items and even add an item to your download queue. To view your download queue just tap the download notification at the bottom of the main view. If you want to pause the downloading, tap and hold the downloading item and tap pause. Tap resume to continue the download.
How to Create a Start Screen for Kids on Nokia Lumia 525
With Kids Corner feature on Nokia Lumia 525, you can now let your kids use your Lumia phone without worrying that they might delete important files on your phone or purchase apps without your consent. Just create their own start screen and personalise it with their favorite apps or games. Heres how to create a start screen for your kids on Nokia Lumia 525.
1. On your devices start screen, swipe left and tap Settings.
2. Then tap on Kids corner.
3. Now you can create a fun and safe start screen for your kids. Choose which content your kids can use and even create a password so they cant access your own start screen.
4. To let your kids buy game points or define a Wallet PIN, you must enter the Wallet PIN to make each purchase. To define a Wallet PIN, swipe left on the start screen and tap Wallet >
 > settings+PIN.
5. To turn off kids corner, swipe left on your start screen and tapSettings. Then switch kids corner off.
If you want to go back to your own start screen just press the power key twice and swipe up on your own lockscreen. To go back to kids corner, swipe left on your start screen and swipe up on the kids lockscreen.
1. On your devices start screen, swipe left and tap
Settings.2. Then tap on Kids corner.
3. Now you can create a fun and safe start screen for your kids. Choose which content your kids can use and even create a password so they cant access your own start screen.
4. To let your kids buy game points or define a Wallet PIN, you must enter the Wallet PIN to make each purchase. To define a Wallet PIN, swipe left on the start screen and tap
Wallet >> settings+PIN.5. To turn off kids corner, swipe left on your start screen and tap
Settings. Then switch kids corner off.If you want to go back to your own start screen just press the power key twice and swipe up on your own lockscreen. To go back to kids corner, swipe left on your start screen and swipe up on the kids lockscreen.
iPhone 4s Usb Ways Jumper fix problem

Nokia c1 01 charging problem solution
This is nokia c1-01 charging problem ,charging not work, charging ways solution.View below picture and read below note.
How to do this work: Check red mark parts and jumper.
Tuesday, August 26, 2014
How To Root N7100XXUEML2 Galaxy Note 2 N7100 Android 4 3 JB Firmware
Samsung Galaxy Note GT-N7100 2 was recently updated to Android 4.3 Jelly Bean. If you have not updated then visit here: Install Android 4.3 XXUEML2 JB Firmware on Galaxy Note 2 N7100 - How To Guide. So, if you update the devices latest firmware update then the next thing youre looking for the root of Android 4.3 Jelly Bean N7100XXUEML2 firmware running on the Samsung Galaxy Note GT-N7100 2. In this page we will help you to eradicate XXUEML2 Android 4.3 Jelly Bean firmware. Continue reading this tutorial.

Once rooted, you can access the file system, can overclock / underclock the CPU and GPU, can use the MOD and their various applications that require root access. However, once you root your device, the manufacturers warranty will be void. You can only get back to the proper follow unroot process.
Pre Requisites:
Though root don’t erase internal memory data but we recommend to back up your data first before proceeding to avoid any uncomfortable situation.
1. Backup your device data. You can follow our ultimate backup guide.
2. Make sure your device have at least 60% battery power. You can install an app like Battery Notifier BT Free on your Android device to check it easily.
3. You already have USB Driver Installed for Galaxy Note 2 GT-N7100 in your PC. Download USB Drivers
4. Make sure USB Debugging is enabled otherwise you won’t able to transfer file between PC and Galaxy Note 2 GT-N7100. Guide
How To Root N7100XXUEML2 Android 4.3 Jelly Bean On Galaxy Note 2 GT-N7100
- Download Odin v3.09 and root file for N7100XXUEML2.
- Extract CF-Root zip file that you downloaded earlier from above link, you will get a .tar.md5 file.
- Extract Odin zip file and you will get Odin3 v3.09.exe along with few other files.
- Power off your Android device. Wait 5-6 seconds for vibration to confirm complete switch off.
- Now, put the Galaxy Note 2 GT-N7100 in Download Mode by pressing and holding down the Volume Down,Home and Power button together. A warning screen will come up; press Volume Up button to enter Download Mode.
- Now run Odin3 v3.09.exe (see Step 3) as an Administrator because Admin privileges is required to complete the process smoothly (only applicable Windows Vista and higher).
- Now connect your device to your PC using USB cable. An “Added!!” massage will appear in Odin’s message box. If you don’t get the same then you should try another USB port (try USB port located in back in your desktop PC). If that too don’t work then you should reinstall the driver. If you successfully see the “Added!!” message in Odin then you are ready to go in next step. You should also see COM port with a number in Yellow if you successfully added your device.
- Click the AP Button, and select that CF-Auto-Root-t03g-t03gxx-gtn7100.tar.md5 file that you get in Step 2.
- In Odin window, make sure only Auto Reboot and F. Reset Time checkboxes are selected.
- Double check everything that we mentioned in Step 8 & Step 9 above. Now, once satisfied hit the START button to begin the flashing process.
- Once flashing completed, your Galaxy Note 2 GT-N7100 will restart and soon you will see a PASS message with green background in the left-most box at the very top of the Odin. You can now unplug the USB cable to disconnect your device from computer.
Congrats! You just rooted Samsung Galaxy Note 2 GT-N7100 running on N7100XXUEML2 Android 4.3 Jelly Bean firmware. To confirm if you successfully rooted your Android device or not install an app called “Root Checker” which is available for free from Google PLAY store.
Subscribe to:
Posts (Atom)