Showing posts with label 1800. Show all posts
Showing posts with label 1800. Show all posts
Monday, October 27, 2014
Nokia 1800 and Nokia 1616 Solution to fix Charger Not Supported on
Charger not supported occurs if the battery temperature resistor is being damaged, This solution shows the exact location of this said chip resistor on the main PCB board. This chip resistor needs to replace if a charger not supported will show on the LCD display screen during when a battery charger is being plug-in.
 The value of this said chip resistor is 47K, you may find a replacement on it any non working old nokia PCB board.
Nokia 1800 and nokia 1616 charger not supported solution
Sunday, October 26, 2014
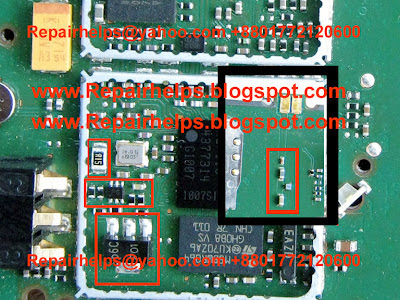
Nokia 1800 and Nokia 1616 Charging problem solution
This solution shows the complete line paths of Nokia 1800 and Nokia 1616 charging circuit connections that can be used for repairing charging problem issues on the device such as, Not charging, Charging no response when inserted or it does not show charging indication when a charger is being plug-in.

Repair Procedure on Nokia 1800 and Noki1616 not charging problem.
procedure below may varies accordingly from case to case basis.
1. Check the charging pin connector if its free from dirt and corrosion. Clean it if corroded or find a replacement spare on it then replace it.
2. Check and clean the charging pin connector terminal contact pads.
3. Check the chip fuse if it is busted or damaged by using a multimeter. If found damaged, check the chip diode if shorted. Replace both of it the dont apply jumper on the chip fuse, this method can still save the phone in the future, if you apply jumper on it directly the phone will be dead if a short circuit happen on that particular area again and other than that, its so very unprofessional way.
You can easily find a replacement of this spare parts component to other non working PCB board.
4. Check all the components remaining as shown on the solution picture, a resistor marked R2200 is a fusible resistor which has a value of 0.55 ohms. This resistance value consider as fusible and may easily break or cut if a short circuit has occurs like a water damaged devices.
5. Those transistor shown in the solution image is the voltage regulator that holds and control the charging voltage from the battery charger. The small one has six legs on it and the other one which the big has three legs, just refer to the PCB board layout of your device for the exact component layout.
replace both of it if not so familiar to check those components.
6. The last part needs adequate experience to perform if all of the above does not solve the problem,
Take note: you may do this at your own risk.. just dont do it if your just a beginner or you may end up killing the phone. re-flowing and reworking the X-gold 110 chip needs extra care and proper training.
Nokia 1616 and Nokia 1800 Not Charging Solution ( circuit connection line paths )
Nokia 1616 and Nokia 1800 charging ways
Repair Procedure on Nokia 1800 and Noki1616 not charging problem.
procedure below may varies accordingly from case to case basis.
1. Check the charging pin connector if its free from dirt and corrosion. Clean it if corroded or find a replacement spare on it then replace it.
2. Check and clean the charging pin connector terminal contact pads.
3. Check the chip fuse if it is busted or damaged by using a multimeter. If found damaged, check the chip diode if shorted. Replace both of it the dont apply jumper on the chip fuse, this method can still save the phone in the future, if you apply jumper on it directly the phone will be dead if a short circuit happen on that particular area again and other than that, its so very unprofessional way.
You can easily find a replacement of this spare parts component to other non working PCB board.
4. Check all the components remaining as shown on the solution picture, a resistor marked R2200 is a fusible resistor which has a value of 0.55 ohms. This resistance value consider as fusible and may easily break or cut if a short circuit has occurs like a water damaged devices.
5. Those transistor shown in the solution image is the voltage regulator that holds and control the charging voltage from the battery charger. The small one has six legs on it and the other one which the big has three legs, just refer to the PCB board layout of your device for the exact component layout.
replace both of it if not so familiar to check those components.
6. The last part needs adequate experience to perform if all of the above does not solve the problem,
Take note: you may do this at your own risk.. just dont do it if your just a beginner or you may end up killing the phone. re-flowing and reworking the X-gold 110 chip needs extra care and proper training.
Wednesday, August 27, 2014
Nokia 1800 charging solution
Nokia 1800 phone charging solution is very common problem.Charging is the very important part of mobile phone.Now I share how to solve this problem.View the below picture and read the below note.
How to do this work : First check charging port if ok next check fuse and diode if damage one of them replace that.If they are ok but problem still then check charging transistor and red mark parts following above picture.
How to do this work : First check charging port if ok next check fuse and diode if damage one of them replace that.If they are ok but problem still then check charging transistor and red mark parts following above picture.
Friday, August 22, 2014
Nokia 1800 network solution

How to do this work : First check ant and ant socket next check ant line if you see they are ok but problem still then rehot pa and check your phone.If you see phone is ok good luck but problem still then replace pa.
Subscribe to:
Posts (Atom)